This LED cube sits neatly on top of your Raspberry Pi like a cute and sparkly hat, with a tonne of functionality! The PiCube is incredibly robust, easy to install, and has a low power usage – making it the ideal product for learning and invention. Program your own 3D light shows by combining the PiCube with your Raspberry Pi, and bring your visual ideas out into the 3d realm!
Create works of art that will astound your friends and family as this matrix takes you beyond the 2D plane. A 3D LED matrix like this works its magic by creating multiple layers, which, when combined create an exciting display or light show. Featuring 64 high-intensity monochromatic LEDs, each layer and each LED can be accessed individually and controlled to your requirements. It’s compatible with Raspberry Pi 4 Model B, 3B+, 3, 2, Zero, and more – and is available in 3 statement colours!
You can order this matrix either fully assembled or as a kit, meaning you can spend a pleasant evening refining your soldering skills before beginning your coding adventure! The maker has provided a fantastic PiCube GitHub repository to get you started, which can be easily downloaded onto your Raspberry Pi.
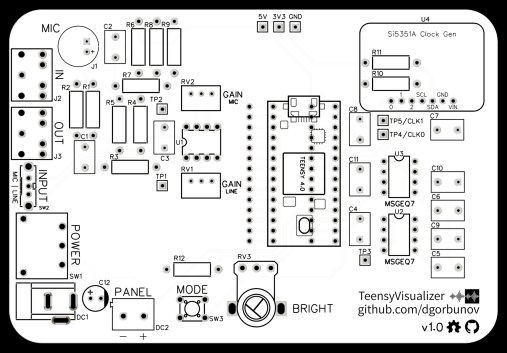
The Teensy 4.0 is a truly fabulous development board. Capable of operating at just over a Gigahertz clock speed with cooling, it’s roughly the size of your finger, and available for around $20. It’s a mind-blowing value, at least to those of us that grew up when that sort of speed would have been a very impressive desktop. Even so, like most dev boards it lacks a few connection niceties, addressed by the Ultimate Breakout Board for Teensy 4.0 by BurgessWorld Custom Electronics.
Highlights of this board include a 1A, 5V power regulator, along with a 2.1mm barrel jack, and a CR2032 battery for maintaining the time and date. An array of serial and I2C ports are provided, along with an SPI connector and CAN bus ports. Finally, a USB-A connector allows the Teensy 4.0 to act as a USB host, and a microSD card slot provides a potentially massive amount of storage capacity.
This board is sold partially assembled with all surface-mount components attached. The buyer will need to take care of soldering on the headers and connectors. An optional 9V power supply is also available, which should come in handy in some circumstances.
If you’re at all like me, you love adding LEDs to any outfit as much as I do. Whether they’re for a party, convention, or just a fun excuse to feel and look good, adding these Fibbonaci LED Goggle Lens Inserts to your closet can add a lot of joy to your day! The 64 surface-mounted LEDs are laid out in a Fibonacci distribution pattern, giving both an aesthetically and mathematically pleasing look to the finished product.
These LED inserts will need some parts and assembly to get working, like a microcontroller, some power, a little soldering, and installation in a pair of goggles. But fret not, because Evil Genius Labs has an excellent write-up (with assembly directions!) on their website. The LED panels can be controlled via I2C, and draw only 320mA when set to 100% brightness on all 64 LEDs – though the creator suggests running them at 25% brightness, giving you plenty of battery options and sizes. And just for a cherry on top of the metaphorical LED sundae, each panel features four capacitive touch-enabled pads, giving you the option for some really fun ways to interact and control the animations on the LEDs.
These LED panels are for 50mm goggles, and if you’re looking for a different size or design, check out the store page for Evil Genius Lab LCC to see all the different options they have there! Based out of Kansas in the United States, they ship from the US and are more than happy to answer questions and are even available for custom work.
Tiny projects call for tiny parts, and the hyper compact 2826 Pixel-Matrix does the job perfectly. Whether you’re working on a breadboard or creating a compact display, this matrix provides a high quality light show in a tight space! Designed from scratch to fill a gap in the market, this brilliant white PCB will really stand out in your components drawer.
With its extra small 2x2mm RGB LEDs, this is one of the tiniest LED matrixes available on the market. Clocking in at only 28.6 x 26.4 mm, this matrix is crazy small and perfect for use on a breadboard. Featuring DIP connections that fit directly into a breadboard, getting started with this matrix is extremely easy; connect it to an Arduino using only 3 wires, and get straight to coding!
There are two separate Arduino libraries that can be used to drive the LED matrix; the Adafruit Neopixel library or the FastLED library. The designer of this product, MAKERPALS, have uploaded an insightful video detailing their build process and how you can utilise this matrix. There are also detailed instructions available on how to program the matrix from scratch, as well as how to link it to a powerful matrix control software that makes the process super simple.
Printed circuit boards are, one might argue, for creating electrical circuits. However, with low-cost, high-quality suppliers just a few clicks away, using them as structural elements isn’t that far-fetched of an idea. As a novel way to “protec” your Raspberry Pi 4, I designed the JC Pi Protec Raspberry Pi Enclosure, made primarily out of PCB material.
The bottom section of the device features a rather plain base PCB, onto which rubber feet can be attached to keep it from sliding around. Screw holes are also provided, and a DIN rail mounting kit is available for industrial-style mounting.
The top cover comes in two flavors. Both have cutouts for fan mounting, and the GPIO pins are printed on the silk screen for easy identification (which has proven to be quite handy). The Smooth Top PCB option has a blank space next to the USB/Ethernet ports, and the Proto Top option instead features a small perfboard area in this section.
While this rather limited prototyping area isn’t big enough for everything, as seen in the video below it can be great for simple tasks like adding a few indicator LEDs to your design. Also featured in the video is my EZ Fan 2 board, which makes it easy to control a cooling fan or other small load with the Raspberry Pi GPIO pins.
Although they’ve been around for decades, resin printers first reached consumers as experimental devices cobbled together from seemingly random bits and bobs. A few years ago, cheap desktop machines appeared on the market, and now more and more hackers and makers have a resin printer sitting on a (hopefully) well-ventilated desk.
With commercial, ready-made resin printers, there’s a bunch of hackers and makers working to make those printers even better. The UV Blaster 30 Kit is one of those hacks, upgrading the Elegoo Saturn resin 3D printer for much faster prints. Like most low-cost resin printers, the Saturn printer works by shining UV light through an LCD to render each layer of a print in resin. By increasing the amount of UV light, layer times go down and print speeds go up.
This kit replaces the existing UV LEDs inside the Elegoo Saturn with almost 100 Watts of UV LEDs, a significant upgrade over the stock 45 Watts of UV power. While this does require an upgrade to the power supply, there’s a really, really good guide for upgrading this printer. If LEDs in machine tools are your thing, the SMDKing storefront has a few really neat upgrades for a few popular drill presses and mills. They’ll shed light on a lot of subjects and make your next project a lot easier.
Expand the limits of your child’s imagination with the awesome Code Lab All-Inclusive Coding Kit, where they can bring ideas to life! Featuring fully guided projects such as a sound-activated ‘clapper’ lights and LED light shows – this award-winning kit is designed to make kids coding fun.
Designed for children with no coding or soldering experience and a love for experimentation, it features a vast selection of high-quality electronic components and a useful instruction book written by teachers, engineers, and designers.
Through experimentation with sound, light, and electricity, this kit helps your child learn the basics of coding. The quick included projects have immediate results, taking learners through building an actual electronic circuit with a rewarding outcome. If you already have an interest in music – maybe you could assemble a music visualizer using the unique LED pixels, play tones through the speaker, or build a piano from scratch!
Free with every kit is access to the Code Lab coding environment and a massive bundle of learning content. With digital content including nearly 9 hours of video walkthroughs, 2200+ lines of editable code, and challenges to test your kids’ coding skills – this kit makes the most of its included components. The microcontroller is an ATMEGA 328P, similar to an Arduino Uno. It is powered using the included USB cable, and you can find a complete list of components on the product page.
Let’s Start Coding are an independent electronics manufacturer based out of Louisville in the USA. They have a passion for helping beginners have fun as they begin to explore coding, helping learners to build their knowledge quicker through physical projects.
The pyramids of Egypt, along with the Spinx and other wonders, have fascinated onlookers for millennia. While we may never quite understand how they were constructed, if you’ve ever wanted to build your own miniature version, you might like to check out the REX Woody Series DIY Egyptian Pyramids by Robotistan.
Unlike the original stone pyramids, this mini-monument is made out of wood, and can be assembled by kids and adults alike. The set comes with a model of the Keops structure, plus the Spinx next to it. The pyramid features an arrangement of LEDs around its perimeter, and it comes with the wiring, batteries, and switch needed to make it shine. While not included, one could see this setup enhanced with a microcontroller board to flash away at random, or even as a reaction to stimulus!
The product page notes that this can be a great learning tool for kids, allowing them to practice their fine motor skills while putting it together, and to compare larger and smaller squares that stack up to the “sky.” The parallel LED circuit that lights up the base can also be a great first step into the world of electronics, perhaps inspiring architecture endeavors in the future!
The 2022 OHS was on April 22, 2022. It was held online this year — though hopefully next year will be in person! The summit was a great success, and it was hugely informative and entertaining. The opening keynote by Ashley Jane Lewis was simply amazing. As a white man, I don’t feel it’s my place to try and summarize or repeat her message — I simply would like you to go see it and hear it for yourself. You can watch the keynote here:
The summit celebrated all the amazing contributions to Open Hardware over the last year, and as I mentioned in my previous post I was really looking forward to the Open Source Toys for Endangered Animals talk. And they didn’t disappoint! Not only did we get to see some adorable animals (including tapirs and ocelots and sun bears) but we also got to see how Open Hardware was helping to make a real impact on the quality of life of these endangered species. Valencia the tapir showed us that interesting open source hardware doesn’t have to be high-tech! Often low-tech solutions (like a pineapple on a string) can solve the problem (tapir needing stimulation). Not coincidentally, I now really want to visit their lab (Dinalab) in Panama! You can see their entire talk here. Check out some of their clientele in the image below.
As sponsors of the 2022 Summit, we at Tindie got to chat with a bunch of attendees at our virtual “table”. We talked about neat products that are Open Hardware Certified, such as the Mooltipass and the Vinduino (a past Hackaday Prize winner!) that are listed on Tindie. Our sister website Hackaday was there also, revealing info about this year’s upcoming Hackaday Prize. The first challenge Planet-Friendly Power is almost over, and on May 1st the second challenge Reuse, Recycle, Revamp starts. So get your sustainable ideas flowing, and create a project on Hackaday.io to enter the contest!
Sustainability was another key topic at the summit. One of the talks that I really enjoyed was Helen Little’s talk about recycling plastics into 3D printable pellets. She works for a company called re:3D making large-scale 3D printers. They are very interested in creating a sustainable process for reusable, 3D printable plastics. While there are already some filaments available made with recycled plastics, they want to be able to feed ground up plastic directly into a printer.
In order for this process to be practical and sustainable, the resulting plastic pellets have to have material properties that are consistent and strong enough to displace some of the brand-new materials from the market. In order to test the materials, they first dehydrate the recycled plastic, as most plastics are hydrophilic and will pull water from the air. Then using an open-source tool called ImageJ, the particles of the plastic are analyzed to check for grain size differences between different recycling processes. Then they create many prints, including standard additive test pieces like NIST’s Standard Test Artifact (public domain!) and a few other prints for testing various parameters like bed adhesion and extrusion rate (like the Moai above!). There is just so much detail to go into that I strongly recommend you just go watch her talk if you are interested!
The entire summit was a lot of fun. It was great to connect with a bunch of other hackers interested in all sorts of things! If you’re working on something and want to get it certified as Open Hardware, check out their website at https://www.oshwa.org/ and click on the Certification page. If you want to watch the entire summit or just certain talks, check out their YouTube channel where the individual talks have now been uploaded. You can also see the archive of the whole stream.
This Inertial Measurement Unit (IMU) is just about the smallest one we’ve ever seen. With an accelerometer and gyroscope operating at up to 6.7 kHz and a Time-of-Flight sensor, the Tracer from elektroThing will give you the orientation of anything you strap it to, streaming signals back to your phone.
The idea behind the Tracer is to stick an IMU on any object to trace its pose and motion. This can mean anything from taking a mountain bike off a sweet jump, the motion of a tennis racket or golf club when taking a swing, or simply just strapping it to a glove for a new-Power Glove for the metaversal revolution.
To do accomplish all of this, the Tracer uses an IMU capable of measuring acceleration at ±4/4/6/16 g at 1.6 Hz to 6.7 kHz, and measuring position with a gyroscope at ±125/250/500/1000/2000 DPS at 12.5 Hz to 6.7 kHz. Also on board is a Time-of-Flight sensor that is able to measure absolute distances up to 2m.
But sensors alone do not a tracker make, and for talking to the outside world the Tracer uses an ESP32-PICO-D4 to provide WiFi and Bluetooth. All of this is powered by a coin cell battery and should be good for a few hours of runtime. More than enough to get the readings you need, at least.
Of course, the Tracer is programmable with Micropython and Arduino, and fully supports Phyphox to stream IMU readings directly to your phone.
Cookies help us deliver our services. By using our services, you agree to our use of cookies. Learn more.
Cookies help us deliver our services. By using our services, you agree to our use of cookies. Learn More.
The cookie settings on this website are set to "allow cookies" to give you the best browsing experience possible. If you continue to use this website without changing your cookie settings or you click "Accept" below then you are consenting to this.